There’s something magical about that first bite of perfectly crispy rice. The way the golden crust shatters between your teeth before giving way to tender, fluffy grains beneath. That textural contrast—that moment of pure culinary bliss—is what keeps us coming back for more.
I still remember my first encounter with proper crispy rice. It wasn’t in some fancy restaurant, but at my friend’s grandmother’s house, where she effortlessly flipped a pot of Persian tahdig onto a serving plate, revealing a perfectly caramelized disk of rice that had the entire table gasping in appreciation. For years afterward, my attempts to recreate that golden crust at home left me frustrated—either burnt beyond recognition or disappointingly soggy.
If you’ve struggled with achieving that perfect crispy rice texture, you’re not alone. The good news? Creating restaurant-quality crispy rice at home isn’t just possible—it’s absolutely achievable once you understand a few fundamental principles. Let’s dive into the techniques that will transform your rice from merely cooked to memorably crispy.
What Makes Rice Crispy? The Science Behind the Crunch
To master crispy rice, you first need to understand what’s happening at the molecular level. When rice cooks, two critical processes occur: starch gelatinization and the Maillard reaction.
Starch gelatinization happens when rice grains absorb water and swell. The starch molecules break down, creating that tender, fluffy texture we associate with properly cooked rice. But crispy rice takes things a step further. When those gelatinized starches come into contact with hot oil and a heated surface, they undergo the Maillard reaction—a complex chemical process that creates hundreds of flavor compounds and that beautiful golden-brown color.
This transformation isn’t just about appearance. The Maillard reaction is responsible for developing the nutty, toasted flavors that make crispy rice so irresistible. Additionally, as moisture evaporates from the surface of the rice, the starch molecules reconfigure themselves into a rigid structure, creating that satisfying crunch.
- Bist Amazon Picks:
Not all rice varieties crisp equally. The starch composition varies significantly between types, with short-grain varieties typically containing more amylopectin (a branched starch) that creates stickier rice, perfect for developing uniform crispy layers. Long-grain varieties, with their higher amylose content, tend to remain more separate, creating a different kind of crispy texture.
Across culinary traditions, from Persian tahdig to Korean nurungji to Spanish socarrat, cooks have developed techniques specifically designed to maximize this scientific process, creating dishes that celebrate the textural contrast between crispy and tender.
Choosing the Right Rice for Crispy Results

Best Rice Varieties for Crispy Textures
Your rice selection significantly impacts your crispy results. Here’s how different varieties perform:
Short-grain rice (such as Japanese sushi rice or Calrose) contains more amylopectin, making it stickier when cooked. This cohesiveness helps form an even layer against your cooking vessel, resulting in a uniform crispy crust. These varieties are ideal for dishes like Korean nurungji or Japanese yakimeshi.
Medium-grain rice offers a balanced approach. Varieties like Arborio or Bomba rice (traditional for paella) retain enough stickiness to form a crust while maintaining some grain definition. These work exceptionally well for dishes like Spanish socarrat, where the individual grains remain identifiable within the crispy bottom layer.
Long-grain rice varieties like Basmati or Jasmine can still achieve crispiness, particularly in dishes like Thai fried rice or certain Persian preparations. However, because they contain more amylose, they’ll create a different texture—more individually crispy grains rather than a cohesive crust.
For beginners, Japanese sushi rice or medium-grain Calrose are forgiving options that reliably produce good results.
The Importance of Properly Cooked Base Rice
Before rice can become crispy, it needs to be properly cooked. Surprisingly, day-old refrigerated rice often delivers superior results compared to freshly cooked rice. Why? The cooling process allows the starch molecules to retrograde, firming up the grains and reducing moisture content.
When cooking rice specifically for crisping, consider these ratios:
- Short-grain rice: 1 cup rice to 1.1 cups water
- Medium-grain rice: 1 cup rice to 1.25 cups water
- Long-grain rice: 1 cup rice to 1.5 cups water
These slightly reduced water ratios result in drier cooked rice that crisps more effectively. Allow your cooked rice to cool completely before proceeding with any crisping techniques.
Essential Equipment for Perfect Crispy Rice
Pan Selection Matters
Your choice of cooking vessel significantly impacts your crispy rice results. Consider these options:
Cast iron pans distribute heat evenly and retain thermal energy exceptionally well. This consistent heat helps develop uniform crispiness across the entire rice surface. Cast iron’s slightly rough surface also provides more contact points for the rice to adhere to, enhancing browning.
Carbon steel pans offer similar heat retention to cast iron but heat up and cool down more quickly. They’re somewhat lighter and more responsive to temperature adjustments, making them excellent for cooks who prefer more control over the crisping process.
Non-stick pans can be convenient, especially for beginners worried about sticking. However, they typically don’t achieve the same level of crispiness as traditional metals since they limit direct contact between the rice and the cooking surface. If using non-stick, you’ll need to compensate with longer cooking times and possibly higher heat.
Stainless steel provides good heat conduction and can create excellent crispy rice, though it requires more attention to prevent sticking. A well-seasoned stainless steel pan can produce results comparable to cast iron.
The ideal pan has a heavy bottom for heat retention and straight sides that allow you to pack the rice firmly against the cooking surface.
Specialty Tools Worth Considering
Several traditional tools exist specifically for creating crispy rice:
Korean dolsot (stone bowls) retain heat excellently and create the distinctive nurungji (scorched rice) served at the bottom of bibimbap or as a separate dish.
Clay pots used in Chinese cooking distribute heat gently and evenly, allowing the bottom layer of rice to develop a perfect golden crust without burning.
Persian damkesh (diffuser) helps regulate heat when making tahdig, ensuring the rice crisps slowly and evenly without burning.
Special rice paddles with thin edges help gently separate crispy sections without breaking them apart.
While these specialty tools can enhance your crispy rice experience, they’re not essential for beginners. Start with a good quality cast iron or carbon steel pan before investing in specialized equipment.
Step-by-Step Methods for Different Crispy Rice Styles
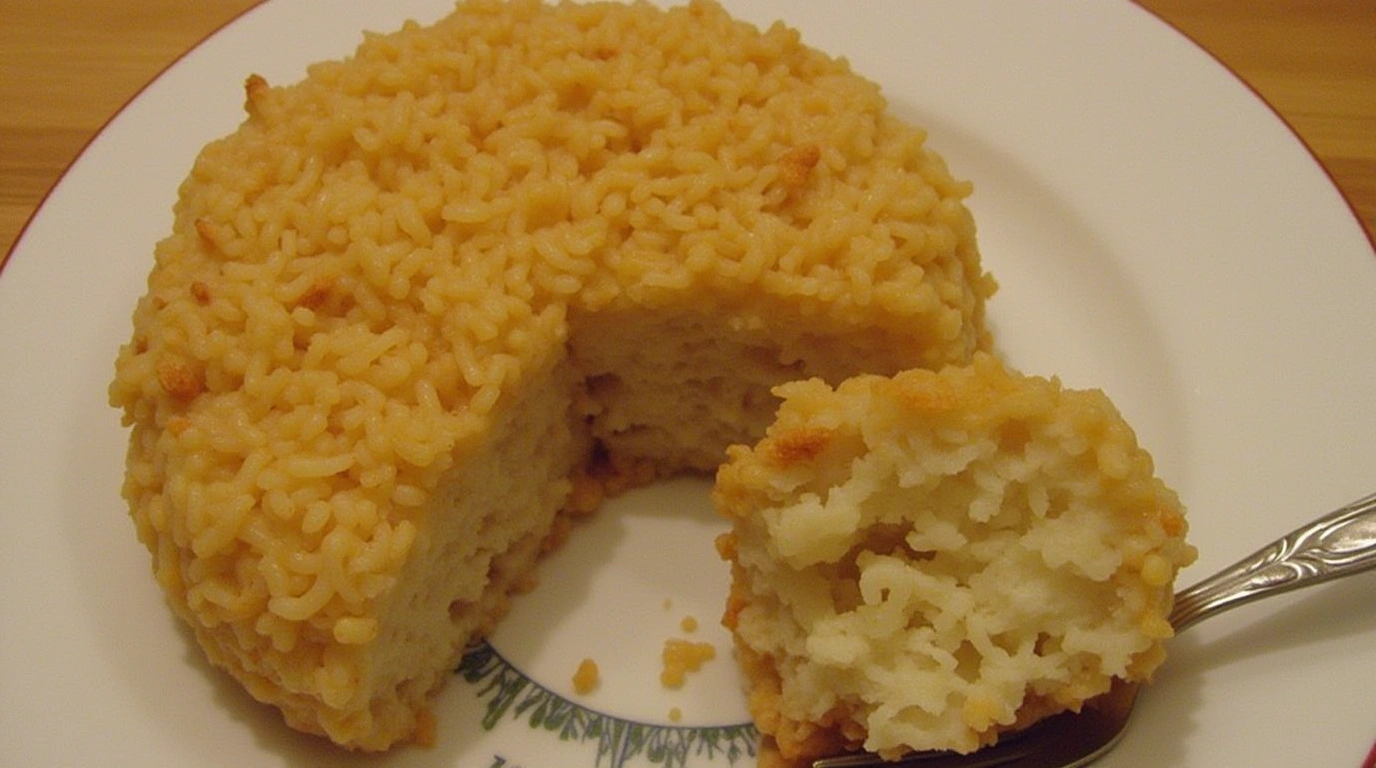
Tahdig (Persian Crispy Rice)
Tahdig, meaning “bottom of the pot” in Persian, is perhaps the most celebrated crispy rice preparation worldwide. Here’s how to create this showstopping golden disk:
- Begin with par-cooked rice (about 7 minutes of boiling, then drained).
- Heat 3 tablespoons of oil and 2 tablespoons of butter in a heavy-bottomed pot.
- For the traditional method, mix 1 cup of par-cooked rice with 3 tablespoons of yogurt and 1 teaspoon of saffron water.
- Spread this mixture evenly across the bottom of the heated pot.
- Gently pile the remaining rice into a pyramid shape.
- Poke 5-6 holes through the rice with the handle of a wooden spoon (this helps steam escape).
- Cover the pot with a kitchen towel, then the lid (the towel absorbs excess moisture).
- Cook over medium-low heat for about 30-35 minutes until the bottom is golden brown.
- Submerge the pot’s bottom in cool water for 30 seconds to help release the tahdig.
- Carefully flip onto a serving platter.
Troubleshooting: If your tahdig isn’t crispy enough, you likely used too little oil or too low heat. If it’s burning, your heat is too high or cooking time too long.
Nurungji (Korean Scorched Rice)
This Korean technique creates a delicious crispy layer at the bottom of the rice pot:
- After cooking rice normally in a heavy pot, remove the lid and continue cooking over low heat.
- Listen for a subtle crackling sound that indicates the bottom layer is crisping.
- Once you smell a nutty aroma (about 10-15 minutes), remove from heat.
- Serve the regular rice first, then later scrape the crispy bottom layer as a separate treat.
For dolsot (stone bowl) nurungji:
- Heat your stone bowl until very hot.
- Coat with sesame oil.
- Pack cooked rice firmly into the bowl.
- Cook over medium heat for 10-15 minutes until the rice forms a crispy layer.
- Serve in the bowl (careful, it’s hot!) or transfer to a plate.
Socarrat (Spanish Paella Base)
The crispy bottom layer of paella is considered the crown jewel of this Spanish dish:
- After adding all paella ingredients and cooking until the rice is nearly done, increase heat to medium-high.
- Listen for a crackling sound (this is the socarrat forming).
- Smell for a toasty aroma, but be careful not to let it burn.
- Remove from heat and let rest for 5-10 minutes before serving.
The key to perfect socarrat is not stirring the rice during the final cooking stage. This allows the bottom layer to form that characteristic crust.
Chinese Clay Pot Rice Technique
This method creates individual portions with a crispy bottom:
- Soak rice for 1 hour, then drain.
- Heat a clay pot over medium heat.
- Add 1 tablespoon oil and swirl to coat the bottom.
- Add rice and appropriate water (usually 1:1 ratio).
- Bring to a boil, then reduce to low heat.
- Cover and cook for 15 minutes.
- Without opening the lid, turn off heat and let sit for 10 minutes.
- Add toppings and serve directly in the pot, scraping the crispy bottom as you eat.
Master Recipe: Basic Crispy Rice Technique
Ingredients Table:
| Ingredient | Amount | Notes |
|---|---|---|
| Cooked rice | 2 cups | Preferably day-old |
| High-heat oil | 3 tablespoons | Avocado, grapeseed, etc. |
| Salt | To taste | |
| Optional butter | 1 tablespoon | For enhanced flavor |
| Optional aromatics | As desired | Garlic, herbs, etc. |
Step-by-Step Instructions
- Ensure your rice is fully cooled and slightly dry (day-old refrigerated rice works best).
- Heat a heavy-bottomed pan over medium-high heat until hot.
- Add oil and optional butter; swirl to coat the entire bottom surface.
- When the oil is shimmering but not smoking, add your rice.
- Use a spatula to spread the rice evenly across the pan, pressing down gently to create a uniform layer.
- Reduce heat to medium-low and cook undisturbed for 5-7 minutes.
- Check the edges—they should be turning golden brown.
- Continue cooking until you hear a subtle crackling sound and smell a nutty aroma.
- For uniform crispiness, you can place a heatproof plate over the pan and carefully flip, then slide the rice back into the pan, crispy side up.
- Cook for another 3-5 minutes to crisp the other side.
- Remove from heat and serve immediately.
Visual Cues for Doneness
Look for these signs to know when your crispy rice is perfectly done:
- Edges turning golden brown
- A subtle crackling sound
- Nutty, toasty aroma
- Firm resistance when pressed with a spatula
- Slight pulling away from the edges of the pan
Troubleshooting Tips
- Rice sticking too much? Your pan might not be hot enough when adding the rice.
- Burning before crisping? Your heat is too high; reduce it and try again.
- Not getting crispy? You may need more oil or a longer cooking time.
- Rice too dry? Add a tablespoon of water or broth before pressing it into the pan.
Flavor Variations and Serving Suggestions
Global Flavoring Ideas
Transform your crispy rice with these international flavor profiles:
- Persian: Saffron, dried barberries, and crushed pistachios
- Korean: Sesame oil, kimchi, and gochujang
- Spanish: Smoked paprika, saffron, and olive oil
- Thai: Lemongrass, lime leaf, and fish sauce
- Chinese: Ginger, scallion, and soy sauce
- Mexican: Cumin, lime, and cilantro
- Indian: Turmeric, mustard seeds, and curry leaves
Creative Toppings for Crispy Rice Bases
Crispy rice makes an excellent base for numerous toppings:
- Spicy tuna or salmon with avocado (sushi-inspired)
- Roasted vegetables with tahini drizzle
- Sunny-side-up egg with chili crisp
- Slow-cooked pulled pork or beef
- Marinated tofu with pickled vegetables
- Curried chickpeas with yogurt sauce
- Sautéed mushrooms with truffle oil
Making Crispy Rice the Star of Your Meal
Consider these recipe ideas where crispy rice takes center stage:
- Crispy rice cakes topped with ceviche
- Bibimbap with nurungji base
- Crispy rice salad with herbs and citrusy dressing
- Breakfast bowls with crispy rice, eggs, and vegetables
- Crispy rice fritters with dipping sauce
- Dessert variations with sweetened coconut rice
Common Mistakes to Avoid When Making Crispy Rice
- Stirring too soon: Once you’ve pressed your rice into the pan, resist the urge to check or stir it. Movement disrupts the crisping process.
- Insufficient oil: Crispy rice requires enough fat to conduct heat effectively and create that golden crust. Don’t skimp on the oil.
- Inconsistent heat: Frequent temperature adjustments lead to uneven results. Find the right heat level and maintain it.
- Overcrowded pan: Too much rice prevents proper crisping. Work in batches if necessary.
- Using wet rice: Excess moisture steams the rice rather than crisping it. Ensure your rice is properly dried before attempting to crisp it.
- Improper pan selection: Thin-bottomed pans create hot spots and uneven browning. Choose heavy-bottomed cookware for best results.
- Rushing the process: Crispy rice requires patience. Cooking at too high a temperature to speed things up typically results in burnt exteriors and undercooked interiors.
Health Considerations: Making Crispy Rice Part of a Balanced Diet
While crispy rice often involves oil, it can still be part of a nutritious eating plan. Consider these healthier approaches:
- Use heart-healthy oils like olive oil or avocado oil
- Incorporate brown rice or mixed grains for added fiber and nutrients
- Add vegetables to your crispy rice for additional vitamins and minerals
- Control portion sizes by using crispy rice as a garnish or component rather than the main dish
- Reduce sodium by using herbs and spices instead of salt for flavoring
Rice itself offers several nutritional benefits, providing carbohydrates for energy, some protein, and various vitamins and minerals. The crisping process doesn’t significantly alter these nutritional properties, though it does add calories from the cooking oil.
Conclusion
Mastering crispy rice is like unlocking a secret level in your culinary journey. Once you understand the principles—proper rice selection, sufficient heat, adequate fat, and patience—you’ll be able to create that perfect golden crust consistently.
Remember that practice makes perfect. Each attempt teaches you something about your particular stove, pans, and preferred rice varieties. Don’t be discouraged by early failures; even experienced cooks occasionally end up with rice that’s either too burnt or not crispy enough.
The joy of breaking through that perfect golden crust to reveal the tender grains beneath is worth the effort. Whether you’re recreating a traditional tahdig for a dinner party or simply elevating leftover rice for a quick lunch, those crispy bits will always be the first to disappear from the plate.
So heat up that pan, grab your favorite rice, and start experimenting. Your perfect crispy rice awaits!
Frequently Asked Questions About Crispy Rice
Why isn’t my crispy rice getting crispy enough? You might be using too little oil, too low heat, or not giving it enough time. Also check that your rice isn’t too wet—drier rice crisps better.
Can I make crispy rice with freshly cooked rice? While possible, day-old refrigerated rice works much better as it’s drier and the starches have had time to firm up. If you must use fresh rice, cook it with slightly less water than normal and let it cool completely before crisping.
What’s the best oil for making perfect crispy rice? High-heat neutral oils like grapeseed, avocado, or refined coconut oil work best. For flavor, you can mix in some sesame oil or butter, but be careful as these have lower smoke points.
How do I prevent my crispy rice from burning? Monitor your heat carefully and listen for the rice. When you hear steady crackling, that’s good. If the crackling becomes intense or you smell burning (rather than toasting), reduce the heat immediately.
Is crispy rice healthy? Crispy rice can be part of a balanced diet when prepared with healthy oils and combined with nutritious toppings. The crisping process doesn’t significantly alter the nutritional profile of the rice itself.
Can I make crispy rice in advance for a dinner party? Yes, though it’s best served fresh. You can par-cook the rice in advance and complete the crisping process just before serving. Alternatively, fully prepare it and reheat in a hot oven for 5-10 minutes to restore some crispiness.
Why is crispy rice so popular in different cuisines around the world? Crispy rice represents a universal appreciation for textural contrast and the complex flavors produced by the Maillard reaction. Most rice-eating cultures have independently developed techniques to celebrate those delicious crispy bits, showing how great culinary minds think alike!
