Table of Contents
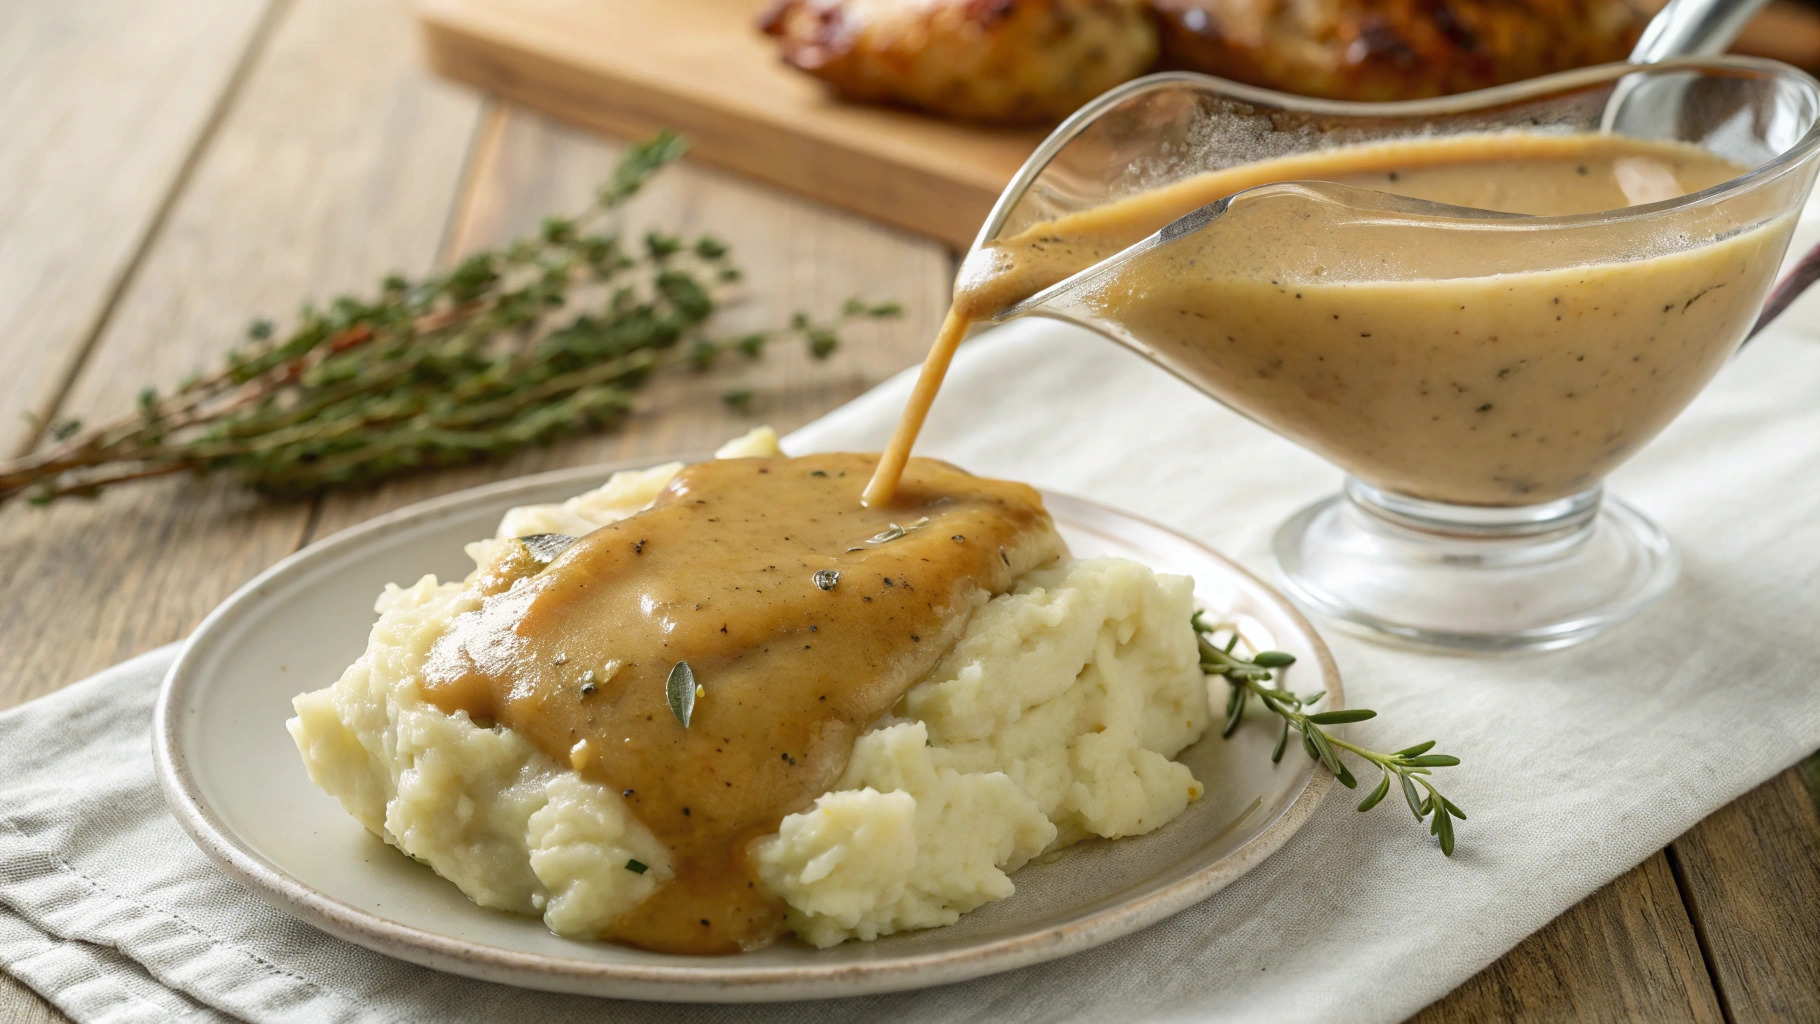
There’s something deeply comforting about homemade chicken gravy cascading over a mound of fluffy mashed potatoes or coating a slice of tender roast chicken. Family gatherings and Sunday dinners become extraordinary occasions when this liquid gold makes an appearance on the table. Despite its humble ingredients, chicken gravy transforms ordinary meals into memorable experiences that bring people together.
- Bist Amazon Picks:
Many home cooks shy away from making gravy from scratch, fearing lumps or bland results. But fear not—with the right techniques and a bit of practice, you’ll soon be creating silky, rich chicken gravy that outshines any store-bought version. This comprehensive guide will take you through every step of the process, from basic principles to advanced variations, ensuring your gravy game reaches new heights.
What Makes Perfect Chicken Gravy?
Before diving into specific recipes, understanding the fundamentals of exceptional chicken gravy will elevate your cooking knowledge and results. The difference between ordinary and extraordinary gravy often lies in these foundational elements.
The Science Behind Creamy Gravy
At its essence, chicken gravy relies on a simple culinary principle: the emulsion of fat and liquid bound together by starch. This combination creates that velvety texture we all crave. When flour meets fat (typically in the form of drippings or butter), it forms what French cuisine calls a “roux.” This mixture then gradually incorporates liquid, developing into a smooth, cohesive sauce.
The magic happens when you cook this mixture properly. Heat causes the starch molecules in flour to expand and absorb liquid, creating a network that thickens your gravy. Too little cooking time results in raw flour taste, while too much heat too quickly leads to lumps.
Perfect gravy requires:
- Equal parts fat and flour for ideal thickness
- Slow incorporation of warm (not cold) liquid
- Constant whisking during liquid addition
- Sufficient simmering time to cook away raw flour taste
Many gravy mishaps stem from rushing this process. Patience truly rewards you when making chicken gravy from scratch.
Essential Equipment
While gravy doesn’t require fancy gadgets, having the right tools significantly improves your results:
- Heavy-bottomed saucepan: Distributes heat evenly, preventing hot spots that cause burning
- Wire whisk: Incorporates liquid smoothly and breaks up potential lumps
- Wooden spoon: Helps scrape flavorful bits from the pan bottom
- Fine-mesh strainer: Creates silky-smooth texture by removing any remaining solids
- Fat separator: Makes it easier to separate drippings from fat (though not absolutely necessary)
Investing in these basic tools pays dividends across many cooking applications beyond just gravy-making.
Classic Chicken Gravy Recipe
Now that you understand the principles, let’s dive into creating a foundational chicken gravy recipe that serves as the perfect starting point.
Ingredients

| Ingredient | Amount | Notes |
|---|---|---|
| Chicken drippings | 1/4 cup | From roasted chicken |
| Butter | 2 tablespoons | Unsalted preferred |
| All-purpose flour | 3 tablespoons | Sifted for best results |
| Chicken stock | 2 cups | Low-sodium recommended |
| Heavy cream | 1/4 cup | Optional, for extra creaminess |
| Salt | To taste | Start with 1/4 teaspoon |
| Black pepper | To taste | Freshly ground recommended |
| Fresh thyme | 2 sprigs | Optional flavor enhancer |
Step-by-Step Instructions
- Collect and prepare chicken drippings After roasting chicken, pour the pan drippings into a fat separator or bowl. Allow the fat to rise to the top, then spoon off 1/4 cup of the fat for your gravy. Reserve the remaining juices to add later—they contain concentrated chicken flavor.
- Create a balanced roux Heat your reserved fat (plus butter if needed to reach 1/4 cup) in a heavy-bottomed saucepan over medium heat. Once melted, sprinkle flour evenly across the surface. Whisk continuously for 2-3 minutes until the mixture turns light golden and smells nutty. This cooking step eliminates raw flour taste.
- Gradually incorporate stock while whisking The critical moment arrives! Begin adding warm chicken stock very gradually—start with just a few tablespoons. Whisk vigorously after each addition until smooth before adding more. This gradual process prevents lumps from forming. Once about half the stock is incorporated, you can add the remainder more quickly while continuing to whisk.
- Simmer to perfect consistency Bring your gravy to a gentle simmer—never a rolling boil. Allow it to cook for 5-8 minutes, whisking occasionally. The gravy will thicken as water evaporates and starch molecules fully expand. You’ll notice it coating the back of a spoon when ready.
- Season and finish Now comes the personalization. Add salt and freshly ground pepper to taste. For extra richness, stir in reserved pan juices (the non-fat portion of your drippings). If using herbs like thyme, add them during the final minutes of simmering. For cream gravy, reduce heat to low and gently stir in heavy cream, being careful not to boil once cream is added.
- Strain for perfection (optional) For restaurant-quality smoothness, pour gravy through a fine-mesh strainer into your serving vessel. This catches any remaining solids or herb stems.
This base recipe yields approximately 2½ cups of gravy, perfect for serving 4-6 people generously.
Variations for Every Taste
Once you’ve mastered the classic version, exploring variations keeps your chicken gravy repertoire interesting and versatile.
Herb-Infused Chicken Gravy
Herbs transform basic gravy into something special, each lending unique characteristics:
- Thyme: Traditional pairing with chicken; earthy, slightly floral notes
- Sage: Robust, perfect for holiday meals; use sparingly
- Rosemary: Piney, aromatic; excellent with roasted chicken
- Parsley: Mild, fresh finish; add at the very end
For dried herbs, add during the simmering phase to allow flavor extraction. Fresh herbs generally work better added in the final minutes to preserve their bright flavors.
Try these specialized combinations:
- French-inspired: Thyme, tarragon, and a splash of white wine
- Italian twist: Rosemary, sage, and a touch of garlic
- Southern comfort: Thyme with a pinch of dried sage and black pepper
Rich & Creamy Upgrades
The basic recipe transforms with these creamy additions:
- Dairy options: Beyond heavy cream, try half-and-half for lighter results, or sour cream for tanginess
- Non-dairy alternatives: Unsweetened almond cream, coconut milk, or cashew cream provide richness without dairy
- Flavor boosters: Consider these additions for depth:
- Dijon mustard (½ teaspoon)
- Soy sauce (1 teaspoon)
- Nutritional yeast (1 tablespoon for umami)
- Caramelized onions (¼ cup, pureed)
Experiment with combining these elements to create signature gravy that becomes your family tradition.
Troubleshooting Common Gravy Issues
Even experienced cooks occasionally encounter gravy challenges. Here’s how to prevent and fix the most common problems.
Fixing Lumpy Gravy
Prevention remains easier than cure, but both approaches work:
Prevention techniques:
- Sift flour before adding to fat
- Add warm, not cold liquid
- Incorporate liquid gradually, especially at the beginning
- Whisk constantly during liquid addition
Rescue methods:
- Vigorous whisking sometimes breaks up small lumps
- Pour through fine-mesh strainer
- For stubborn lumps, blend briefly with immersion blender
- As last resort, start fresh with another roux and slowly incorporate the lumpy gravy as your liquid
Tools that guarantee smoothness:
- Flat whisk reaches pan corners where lumps often form
- Immersion blender for emergency smoothing
- Fine-mesh strainer (absolutely essential for perfect results)
Adjusting Consistency
Gravy thickness preferences vary widely. Here’s how to achieve your ideal consistency:
Too thin:
- Continue simmering to reduce and concentrate (best for flavor)
- Create slurry with 1 tablespoon cornstarch and 2 tablespoons cold water; whisk into simmering gravy
- Add beurre manié (equal parts softened butter and flour kneaded together) in small pieces while whisking
Too thick:
- Add warm stock or water, 1 tablespoon at a time
- Incorporate additional pan drippings if available
- For cream gravy, a splash more cream loosens texture
The perfect consistency coats the back of a spoon but flows smoothly—like warm honey.
Make-Ahead and Storage Tips
Gravy need not be last-minute stress. These strategies help manage preparation:
Proper cooling techniques:
- Cool gravy in shallow containers for faster temperature reduction
- Stir occasionally during cooling to release heat
- Refrigerate once temperature drops below 140°F (60°C)
Refrigeration guidelines:
- Store in airtight containers up to 4 days
- Place plastic wrap directly on gravy surface to prevent skin formation
- Reheat thoroughly to 165°F (74°C) before serving
Freezing methods:
- Freeze in ice cube trays for portion control
- Transfer frozen cubes to freezer bags
- Label with date; use within 3 months
- Note: cream-based gravies may separate when frozen
Reheating without separation:
- Thaw frozen gravy in refrigerator overnight
- Reheat gently on stovetop over low heat
- Whisk frequently while warming
- Add small amount of fresh stock if needed to refresh consistency
With these techniques, you can prepare gravy days or even weeks before special occasions.
Serving Suggestions
While mashed potatoes might be gravy’s classic companion, numerous dishes benefit from this savory sauce.
Classic pairings:
- Roasted chicken (of course!)
- Turkey and stuffing
- Mashed potatoes of any variety
- Biscuits for breakfast gravy
- Yorkshire puddings
Unexpected dishes enhanced by gravy:
- Roasted vegetables like cauliflower or Brussels sprouts
- Grain bowls with quinoa or farro
- Open-faced sandwiches
- Savory crepes or waffles
- Poutine-style french fries
Presentation tips:
- Warm gravy boats maintain temperature longer than cold vessels
- Drizzle gravy artfully rather than flooding plates
- Fresh herb garnish adds visual appeal
- For formal service, strain gravy again just before presenting
Consider offering gravy on the side for guests to add according to their preference, especially when serving diverse audiences.
Conclusion
Creating spectacular chicken gravy transcends mere recipe-following—it’s about understanding principles that transform humble ingredients into culinary magic. The techniques shared here build cooking intuition that applies across many dishes beyond gravy.
Remember that perfect gravy develops with practice. Each batch teaches something new about balance, timing, and flavor. Don’t be discouraged by occasional mishaps; even professional chefs experience gravy emergencies!
The effort invested in mastering homemade chicken gravy pays immeasurable dividends in meals that foster connection and comfort. There’s profound satisfaction in watching family and friends eagerly reach for the gravy boat, knowing you’ve created something special from simple ingredients and time-honored techniques.
Next time you roast chicken, resist the temptation to discard those precious drippings. Instead, transform them into liquid gold that elevates your entire meal. Your dinner guests—and your taste buds—will thank you.
Frequently Asked Questions About Chicken Gravy
Why is my chicken gravy too thin?
When making chicken gravy, insufficient flour in your roux or not simmering long enough typically causes thin consistency. For immediate fixes, try simmering longer to reduce volume naturally, which concentrates flavor while thickening. Alternatively, create a cornstarch slurry (1 tablespoon cornstarch mixed with 2 tablespoons cold water) and whisk into simmering gravy. Remember that gravy continues thickening slightly as it cools.
Can I make chicken gravy without drippings?
Yes! Create delicious chicken gravy without drippings by starting with butter as your fat base. Use high-quality chicken stock (preferably homemade or low-sodium) and enhance flavor with additions like sautéed minced shallots, mushroom powder, chicken bouillon, or a splash of soy sauce for umami depth. Browning the butter slightly before adding flour also develops richer flavor profiles that compensate for missing drippings.
How long does homemade chicken gravy keep in the refrigerator?
Properly stored homemade chicken gravy remains safe and flavorful for 3-4 days in the refrigerator. Always cool gravy completely before transferring to airtight containers. For longer storage, freeze gravy in portion-sized containers for up to three months. Never leave gravy at room temperature longer than two hours, as this enters the food safety “danger zone” where bacteria multiply rapidly.
What’s the secret to silky-smooth chicken gravy?
The secret to perfect chicken gravy combines technique and tools: start with equal parts fat and flour, whisk continuously while gradually adding warm (not cold) liquid, cook flour thoroughly to eliminate raw taste, and strain through a fine-mesh sieve before serving. Professional chefs often strain twice—once after cooking and again just before serving—for restaurant-quality smoothness. Patience during the liquid incorporation phase particularly impacts final texture.
Can chicken gravy be made gluten-free?
Absolutely! Substitute regular flour with rice flour, cornstarch, or commercial gluten-free flour blends when making your chicken gravy roux. Cornstarch creates slightly glossier gravy, while rice flour produces results most similar to traditional wheat flour. Always verify your chicken stock contains no gluten additives. When using cornstarch, create a slurry rather than dry-cooking it with fat. These simple adaptations allow everyone to enjoy delicious gravy regardless of dietary restrictions.
Is it possible to rescue separated chicken gravy?
Yes, chicken gravy that has separated can often be rescued. For minor separation, vigorous whisking while gently reheating usually reemulsifies the ingredients. For more stubborn separation, try blending with an immersion blender or transferring to a standard blender (being careful with hot liquids). Adding a fresh roux sometimes helps rebuild the emulsion structure. Cream-based gravies particularly prone to separation benefit from gentle reheating and a splash of fresh cream whisked in near the end.
