Table of Contents
The first time I experienced the melt-in-your-mouth sensation of perfectly prepared Beef Tataki, I knew my home cooking would never be the same. This elegant Japanese appetizer—with its seared edges and rare center—might seem intimidating, but I’m about to show you how this restaurant-quality dish can become your new dinner party signature.
Beef Tataki stands as a testament to Japanese culinary minimalism: briefly seared beef, sliced paper-thin, and served with a bright, citrusy soy dipping sauce. While it may look like something only professional chefs can master, you’re just seven straightforward steps away from bringing this delicacy to your own table.
What is Beef Tataki? Understanding this Japanese Delicacy
Beef Tataki (“tataki” meaning “pounded” or “hammered”) emerged during Japan’s Edo period when searing meat’s exterior became a practical method to enjoy beef while preserving its delicate flavor. Unlike Western rare beef preparations, Tataki specifically features a quickly seared exterior with an almost-raw center, creating a distinctive texture contrast that defines the dish.
What separates Tataki from its European cousins like carpaccio or tartare is the cooking technique—the brief searing creates complexity while preserving the beef’s natural flavors. In Japanese dining tradition, Tataki frequently appears as a sophisticated starter or izakaya offering, setting the stage for the meal to follow.
Selecting the Perfect Cut of Beef for Tataki
Your Beef Tataki journey begins at the butcher counter. Since this dish showcases the meat in a nearly raw state, quality becomes non-negotiable.
For truly exceptional Tataki, choose center-cut beef tenderloin (filet mignon) or high-grade sirloin. These cuts deliver the perfect balance of tenderness and flavor without overwhelming fattiness. When shopping, look for vibrant red meat with minimal sinew and consistent marbling—those small white streaks indicate flavor that will shine in your finished dish.
- Bist Amazon Picks:
Whenever possible, select grass-fed beef from a reputable butcher who can verify its freshness. The investment in premium meat pays dividends in this particular preparation, where every nuance of flavor comes through.
Essential Ingredients for Authentic Beef Tataki

Table: Core Ingredients
| Component | Ingredients | Quantity |
|---|---|---|
| Main Protein | Center-cut beef tenderloin or sirloin | 1 pound (450g) |
| Searing Seasonings | Kosher salt<br>Freshly ground black pepper | To taste<br>To taste |
| Signature Sauce | Soy sauce<br>Mirin (Japanese sweet rice wine)<br>Yuzu juice or fresh lemon juice<br>Rice vinegar<br>Grated fresh ginger | 3 tablespoons<br>2 tablespoons<br>1 tablespoon<br>1 teaspoon<br>1 teaspoon |
| Garnishes | Thinly sliced scallions<br>Toasted sesame seeds<br>Microgreens or daikon sprouts<br>Grated daikon radish | 2-3 stalks<br>1 tablespoon<br>Small handful<br>2 tablespoons |
Equipment You’ll Need for Perfect Beef Tataki
To create restaurant-quality Beef Tataki in your kitchen, gather these essential tools:
- Heavy-bottomed cast iron skillet or grill pan
- Sharp chef’s knife or sashimi knife
- Kitchen thermometer (recommended but optional)
- Cutting board
- Plastic wrap and kitchen twine (for shaping the beef)
- Small bowl for sauce preparation
- Serving platter
Don’t worry if you lack specialized Japanese knives—any extremely sharp knife will work for the delicate slicing required. The most critical factor is ensuring your chosen blade can create clean, thin cuts without tearing the meat.
Beef Tataki in 7 Easy Steps
Step 1: Preparing Your Beef
Start by trimming any excess fat or silver skin from your beef. While some fat adds flavor, too much will interfere with the clean taste profile of authentic Tataki.
For uniform cooking, shape your tenderloin or sirloin into an even cylinder, tying with kitchen twine if needed. This shape ensures consistent searing and simplifies slicing later.
Allow your beef to reach room temperature (about 30 minutes on the counter) before searing—cold meat directly from the refrigerator won’t sear properly and may cook unevenly.
Step 2: Creating the Perfect Sear
Heat your cast iron skillet or grill pan over high heat until it’s smoking hot—this ensures proper searing without overcooking the interior.
Season your beef liberally with kosher salt and freshly ground black pepper just before cooking. Avoid seasoning too early, as salt draws moisture to the surface, interfering with the searing process.
Once your pan reaches the proper temperature, add a thin layer of high-smoke-point oil (like grapeseed or avocado oil). Place the beef in the pan and sear each side for approximately 30-45 seconds—just long enough to develop a dark crust while keeping the center rare. Roll the beef to sear all sides evenly.
The beef should reach an internal temperature of about 115°F (46°C)—significantly cooler than typical rare beef temperatures, as we’re aiming for a nearly raw center.
Step 3: Cooling and Resting the Beef
Immediately transfer your seared beef to a plate and let it rest at room temperature for 5 minutes. This brief rest allows the proteins to relax and juices to redistribute.
Next comes a critical step many home cooks miss: thoroughly chill your beef. Wrap the seared tenderloin in plastic wrap and refrigerate for at least 30 minutes (or up to 2 hours). This cooling period firms the meat, making it easier to slice ultra-thin, and develops a more complex flavor profile.
Step 4: Preparing the Signature Tataki Sauce
While your beef chills, prepare the traditional ponzu-inspired dipping sauce that defines Beef Tataki.
In a small bowl, combine soy sauce, mirin, fresh yuzu juice (or lemon juice as a substitute), rice vinegar, and freshly grated ginger. Whisk thoroughly and let the mixture stand at room temperature, allowing the flavors to meld.
For a contemporary twist, consider adding a touch of grated garlic or a splash of sesame oil—though purists might prefer the clean, classic preparation.
The perfect Tataki sauce balances salt, acidity, and umami. Taste and adjust as needed, remembering that this sauce will complement rather than overwhelm the delicate beef.
Step 5: Slicing Techniques for Beautiful Presentation
Remove your chilled beef from the refrigerator and unwrap it on a clean cutting board. With your sharpest knife, slice the beef against the grain into paper-thin pieces, approximately 1/8-inch thick or thinner if your knife skills permit.
Hold your knife at a 45-degree angle to create broader slices with more surface area—this enhances both presentation and the eating experience, allowing more sauce to cling to each piece.
Work with deliberate, smooth motions rather than sawing to achieve clean cuts. If the meat begins to warm and becomes difficult to slice, return it to the refrigerator for 10 minutes before continuing.
Step 6: Arranging Your Beef Tataki
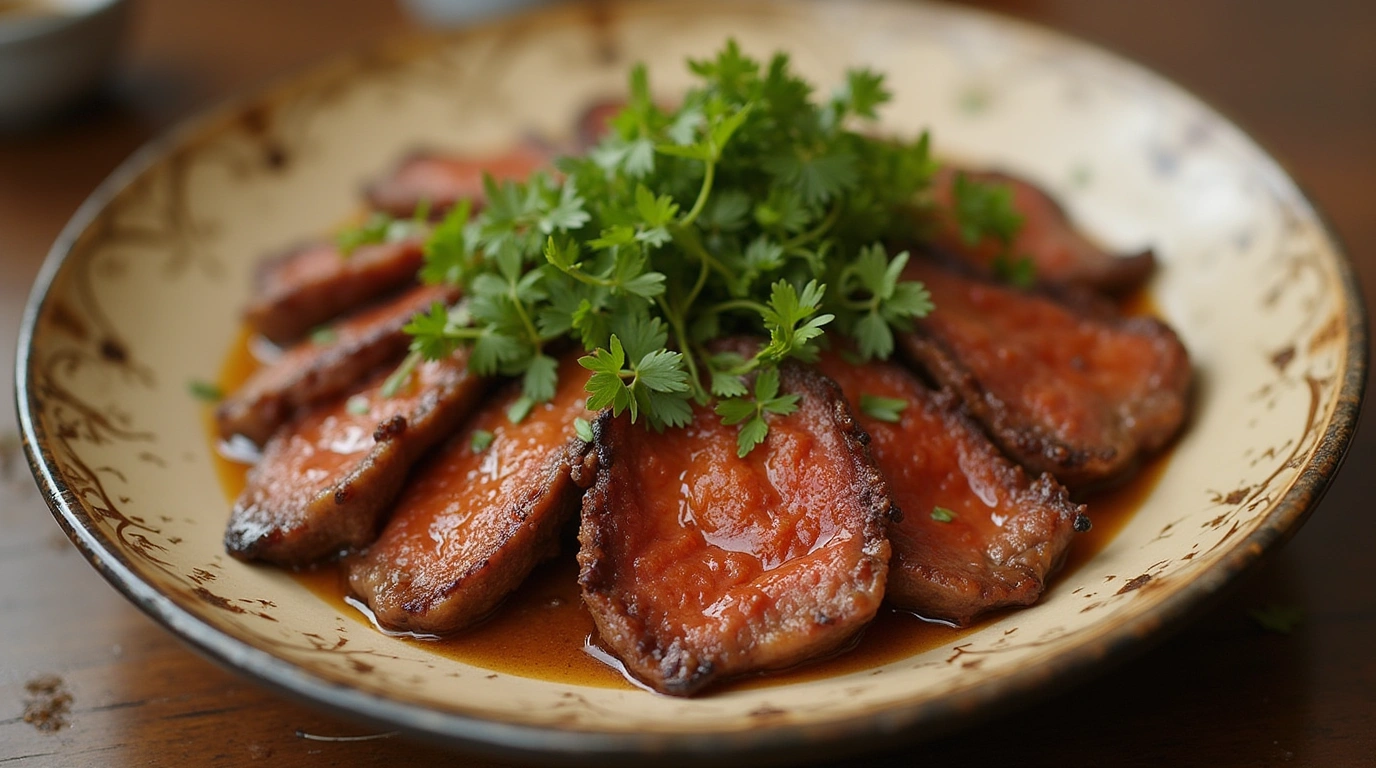
Presentation elevates Beef Tataki from merely delicious to truly memorable. On a chilled serving platter, arrange your beef slices in a slightly overlapping pattern—either in a circular design or in elegant rows.
Drizzle a small amount of your prepared sauce over the beef, reserving most for serving alongside. The visual contrast between the seared exterior and rare interior should be prominently displayed.
Garnish with thinly sliced scallions, a light sprinkle of toasted sesame seeds, and fresh microgreens or daikon sprouts. For authentic presentation, include a small mound of freshly grated daikon radish, which adds a crisp texture and subtle heat that beautifully complements the rich beef.
Step 7: Serving Suggestions and Pairings
Serve your Beef Tataki immediately after plating. The dish should be enjoyed cold or slightly chilled rather than at room temperature.
Provide small individual dipping bowls with additional sauce for each guest. Traditional accompaniments include pickled ginger, wasabi, or thinly sliced cucumber dressed with rice vinegar.
For beverage pairings, consider sake (particularly junmai daiginjo varieties for their clean finish), a light Japanese lager, or a crisp white wine like Sauvignon Blanc or dry Riesling that won’t overwhelm the delicate flavors.
Common Mistakes to Avoid When Making Beef Tataki
Even experienced cooks occasionally stumble when preparing Beef Tataki. Here’s how to sidestep typical pitfalls:
- Choosing the wrong cut: Avoid heavily marbled cuts like ribeye, which can mask the clean flavor profile of traditional Tataki.
- Underseasoning the exterior: While the interior remains largely unseasoned, the seared exterior needs adequate salt and pepper to create flavor contrast.
- Skipping the chilling process: Attempting to slice warm beef results in ragged, thick pieces rather than the signature paper-thin slices.
- Oversaucing: The dipping sauce should complement rather than drown the beef’s natural flavor.
- Slicing with the grain: This creates tough, stringy bites; always identify the direction of muscle fibers and cut perpendicular to them.
If your first attempt doesn’t yield perfection, don’t worry—even minor missteps typically result in a delicious dish, and your technique will improve with practice.
Health and Safety Considerations When Preparing Beef Tataki

While Beef Tataki remains a culinary delight, its preparation involving rare beef warrants attention to food safety practices.
Purchase your beef from reputable sources with high turnover and proper refrigeration. Inform your butcher that you’ll be preparing Tataki, as they might suggest particular cuts that have been handled with raw preparation in mind.
The brief searing process eliminates surface bacteria but doesn’t render the entire piece fully cooked. For this reason, pregnant women, young children, elderly individuals, and those with compromised immune systems should exercise caution with this dish.
Always maintain proper kitchen hygiene: use separate cutting boards for meat preparation, wash hands thoroughly, and clean all surfaces that contact the raw beef immediately.
Variations on Classic Beef Tataki
While traditional Beef Tataki deserves mastery in its classic form, various regional and contemporary interpretations offer exciting possibilities:
In northern Japan, you’ll find variations using different marinades before searing, often incorporating local citrus like sudachi or kabosu. Southern regions might include more robust garnishes like shiso leaves or togarashi spice mix for subtle heat.
Modern chefs have expanded the Tataki technique to other proteins—tuna, salmon, venison, and even duck breast all adapt beautifully to the sear-and-slice approach. Each brings unique flavors while maintaining the textural contrast that defines Tataki.
For an interesting fusion approach, consider incorporating Mediterranean or Latin American influences in your sauce—a light drizzle of high-quality olive oil and flaky sea salt, or a hint of chipotle and lime can create intriguing cross-cultural flavor profiles.
Conclusion
Mastering Beef Tataki allows you to bring an elegant Japanese delicacy into your home cooking repertoire. The contrast between the seared exterior and tender, rare center creates an unforgettable textural experience, while the bright, umami-rich sauce highlights beef’s natural flavor in a way few other preparations can match.
While requiring attention to detail, this dish rewards your effort with sophisticated results that look and taste like they came from a high-end Japanese restaurant. Follow these seven steps carefully, focus on quality ingredients, and you’ll soon be serving Beef Tataki that both impresses guests and satisfies your own culinary aspirations.
We’d love to hear about your Beef Tataki experiences! Share your results, adaptations, or questions in the comments below. And if this preparation has sparked your interest in Japanese cuisine, explore our other guides to bringing authentic Japanese flavors to your home kitchen.
FAQ Section About Beef Tataki
What is the best cut of beef to use for Beef Tataki?
The ideal cuts for Beef Tataki include center-cut tenderloin (filet mignon) or high-quality sirloin. These cuts provide the perfect balance of tenderness and flavor needed for this delicate preparation. The meat should have minimal sinew and moderate marbling. Avoid heavily marbled cuts like ribeye, which can overwhelm the subtle flavors that make Beef Tataki special.
Can Beef Tataki be prepared in advance for a dinner party?
You can prepare Beef Tataki up to 24 hours in advance. Sear and chill the beef as directed, but keep it whole and wrapped tightly in plastic wrap in the refrigerator. Slice the beef and arrange it just before guests arrive. Prepare the dipping sauce ahead of time as well—its flavors actually improve after resting for several hours. Add fresh garnishes at the last minute for optimal presentation.
Is Beef Tataki safe to eat since the meat is rare?
Beef Tataki involves consuming largely rare beef, which carries some inherent risk. The searing process eliminates surface bacteria, which is where most contamination occurs. However, the interior remains essentially raw. Purchase high-quality beef from reputable sources, and inform those with compromised immune systems, pregnant women, young children, or elderly guests about the dish’s preparation. Always maintain strict food safety practices when handling raw meat.
How long can I store leftover Beef Tataki?
Leftover Beef Tataki should be consumed within 24 hours. Store any uneaten portions in an airtight container in the refrigerator. Because the beef is mostly rare, it doesn’t have the shelf life of fully cooked meat. Never refreeze Beef Tataki after preparation, as this significantly increases food safety risks. If you anticipate not consuming the entire preparation, consider searing only the amount needed.
What’s the difference between Beef Tataki and Beef Carpaccio?
While both Beef Tataki and Carpaccio feature thinly sliced raw beef, they differ significantly in preparation and flavor profile. Beef Tataki is briefly seared on all sides, creating a flavorful crust while keeping the interior rare, and is typically served with a soy-based citrus sauce. Italian Carpaccio involves completely raw beef (never seared), pounded very thin, and dressed with olive oil, lemon juice, capers, and sometimes Parmesan cheese.
Can I make Beef Tataki without a kitchen torch?
Absolutely! While restaurant chefs often use kitchen torches for precise searing, a well-heated cast iron skillet or grill pan produces excellent results at home. The key is getting your pan extremely hot before adding the beef, ensuring a quick sear without cooking the interior. A heavy-bottomed pan maintains consistent heat better than thin cookware, which helps achieve the characteristic sear that defines Beef Tataki.
Are there vegetarian alternatives to Beef Tataki?
Vegetarians can enjoy a similar taste experience with “Mushroom Tataki.” Select large, meaty mushrooms like king oyster or portobello caps, briefly sear them, and slice them thinly. The mushrooms’ umami qualities provide a satisfying alternative that pairs beautifully with traditional Tataki sauce. For textural variety, watermelon can be prepared similarly—seared quickly and served rare—offering a unique plant-based alternative with surprising complexity.
What Japanese drinks pair well with Beef Tataki?
Beef Tataki pairs wonderfully with several traditional Japanese beverages. Premium sake, particularly junmai daiginjo varieties with their clean, fruity notes, complements the delicate beef flavors without overwhelming them. Japanese craft beer, especially crisp lagers or light ales, provides refreshing contrast. For non-alcoholic options, consider cold green tea or yuzu-infused water, which cleanses the palate between bites while enhancing the citrus notes in the dipping sauce.
