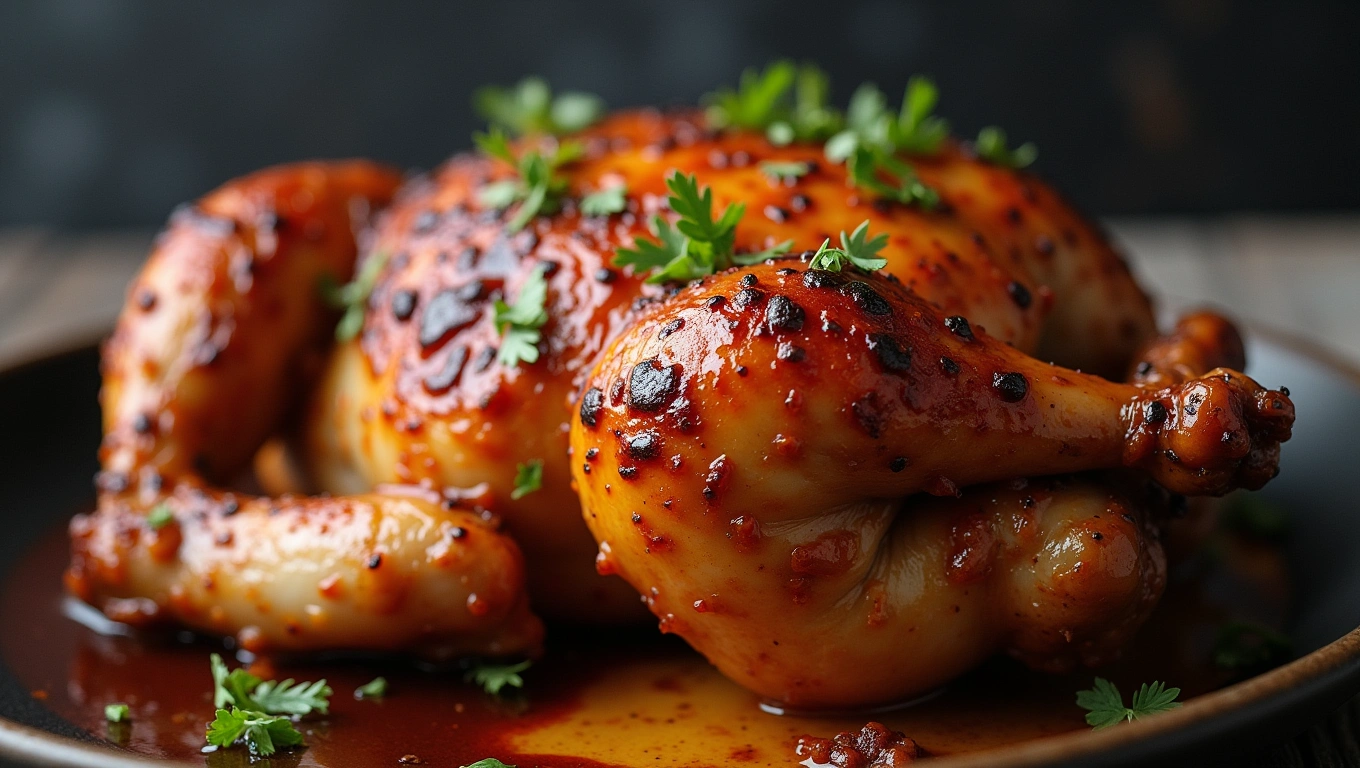
There’s something almost magical about a perfectly roasted spit chicken – that golden, crackling skin giving way to tender, juicy meat that practically falls off the bone. The gentle rotation on the spit allows the chicken to baste itself in its own delicious juices, creating a depth of flavor that’s nearly impossible to achieve in a conventional oven. I still remember the first time I tasted authentic spit chicken at my grandfather’s summer barbecue; the mouthwatering aroma filled the backyard as the bird slowly rotated over glowing coals. What makes spit chicken truly special isn’t just its incredible flavor, but how surprisingly simple it is to master with the right technique. Unlike many complicated dishes that require culinary school training, perfecting spit chicken is within anyone’s reach – whether you’re cooking over an open fire, using a backyard rotisserie, or even an indoor countertop appliance. Many readers who’ve tried my lemon herb roasted chicken have messaged me asking for a foolproof rotisserie version, and today I’m thrilled to share my five-step method that guarantees juicy perfection every single time. Get ready to impress your family and friends with restaurant-quality rotisserie chicken that will have everyone coming back for seconds!
What is Spit Chicken?
Ever wondered why something as delicious as spit chicken has such a strange name? Don’t worry – no actual spitting is involved in the making of this culinary masterpiece! The term “spit” refers to the long metal rod (or spit) that skewers the chicken, allowing it to rotate slowly over heat. This ancient cooking method dates back thousands of years, with evidence of rotisserie cooking found in medieval kitchens across Europe and the Middle East. My grandmother used to joke that spit chicken was invented by a lazy cook who didn’t want to stand there flipping the bird manually – and honestly, I think she might have been onto something! As the old saying goes, “the way to a man’s heart is through his stomach,” and I can’t think of a more direct route than with a perfectly roasted spit chicken. Ready to revolutionize your dinner rotation? Let’s get spinning!
Why You’ll Love This Spit Chicken:
You’re about to discover why spit chicken deserves a permanent spot in your cooking repertoire. First and foremost, the rotisserie method creates chicken with unparalleled juiciness – as the bird slowly rotates, all those flavorful juices continuously baste the meat, resulting in chicken that’s moist and tender in every bite. The skin achieves a perfect golden-brown crispness that simply can’t be matched by conventional oven methods.
From a practical standpoint, making spit chicken at home is incredibly economical. Store-bought rotisserie chickens can cost upwards of $12-15 each, while preparing your own costs just a fraction of that price. Plus, you control exactly what goes into the seasonings – no preservatives or excessive sodium here!
- Bist Amazon Picks:
Speaking of seasonings, the flavor possibilities are endless. From classic herb blends to bold international spices, your spit chicken can be customized to suit any craving or complement any meal. The slow rotation ensures that every inch of the bird gets evenly seasoned, creating a depth of flavor that static cooking methods simply can’t achieve.
If you’ve enjoyed my beer can chicken recipe, you’ll find that spit chicken offers that same juicy interior but with an even more impressive presentation and crackling exterior. Why not try both and see which becomes your family’s favorite? I promise that once you master these five simple steps, you’ll never look at rotisserie the same way again!
How to Make Spit Chicken:
Quick Overview
Preparing perfect spit chicken is surprisingly straightforward, requiring minimal hands-on time while delivering maximum flavor. The gentle rotation ensures even cooking and self-basting, resulting in meat that’s incredibly juicy and tender beneath perfectly crisp skin. What makes this method so appealing is the balance between simplicity and impressive results – even novice cooks can achieve restaurant-quality rotisserie chicken on their first attempt. From start to finish, you’ll need about 15 minutes of prep time and roughly 1.5 hours of cooking time, depending on the size of your chicken.
Key Ingredients for Spit Chicken:

- 1 whole chicken (4-5 pounds), giblets removed
- 2 tablespoons olive oil
- 1 tablespoon kosher salt
- 2 teaspoons freshly ground black pepper
- 2 teaspoons paprika (sweet or smoked)
- 1 teaspoon garlic powder
- 1 teaspoon onion powder
- 1 teaspoon dried thyme
- 1 teaspoon dried rosemary
- 1 lemon, halved
- 4 garlic cloves, peeled
- 1 small onion, quartered
- 2 tablespoons unsalted butter, softened
- Kitchen twine
- Rotisserie spit and forks
Step-by-Step Instructions:
Step 1: Prepare the Chicken
- Remove the chicken from the refrigerator 30-45 minutes before cooking to allow it to come to room temperature. This ensures more even cooking.
- Pat the chicken completely dry with paper towels, inside and out. This is crucial for achieving crispy skin.
- Remove any excess fat from the cavity opening and around the neck.
- Place the chicken on a clean cutting board and arrange it breast-side up.
- Using kitchen shears or a sharp knife, locate the backbone and cut along both sides to remove it completely. This spatchcocking technique will help the chicken cook more evenly on the spit.
- Turn the chicken over and press firmly on the breastbone to flatten it slightly, which will make it easier to secure on the rotisserie spit.
- Tuck the wing tips behind the shoulders to prevent them from burning during cooking.
Step 2: Season the Chicken
- In a small bowl, combine the kosher salt, black pepper, paprika, garlic powder, onion powder, dried thyme, and dried rosemary.
- Rub the olive oil all over the chicken, ensuring complete coverage inside and out.
- Generously sprinkle the seasoning mixture all over the chicken, including inside the cavity and under the skin where possible. Use your fingers to gently lift the skin around the breast and thighs and insert some of the seasoning directly onto the meat.
- Stuff the cavity with the lemon halves, garlic cloves, and onion quarters to add flavor and moisture from within.
- Rub the softened butter underneath the skin of the breast meat to add richness and help the skin crisp up beautifully.
- Let the seasoned chicken rest for 15-20 minutes to allow the flavors to penetrate the meat.
Step 3: Truss and Mount the Chicken
- Using kitchen twine, tie the legs together to help the chicken maintain its shape during cooking.
- Fold the wing tips behind the back of the chicken to prevent burning.
- Carefully insert the rotisserie spit through the chicken, entering from the neck end and exiting through the cavity.
- Position the chicken centrally on the spit, ensuring it’s balanced to prevent wobbling during rotation.
- Secure the chicken firmly with the rotisserie forks, placing them on either side of the bird and tightening them to hold it in place.
- Test the balance by rotating the spit manually – if one side is heavier, adjust the position of the chicken or secure it more tightly.
- If using a charcoal grill, arrange the coals for indirect heat on either side of where the chicken will be. For gas grills, preheat to medium heat (approximately 350°F-375°F).
Step 4: Cook the Chicken
- Install the prepared spit into your rotisserie setup, whether it’s a dedicated rotisserie oven, a grill attachment, or an open-fire setup.
- For a 4-5 pound chicken, plan on about 1.5 hours of cooking time (roughly 18-20 minutes per pound).
- If using a grill, place a drip pan underneath the chicken to catch drippings and prevent flare-ups.
- Start the rotisserie motor and allow the chicken to rotate continuously throughout the cooking process.
- For added flavor, you can place soaked wood chips in a smoker box or in foil packets with holes punched in them near the heat source.
- Maintain a consistent temperature of 350°F-375°F throughout cooking.
- After about 45 minutes, check the color of the skin – if it’s browning too quickly, reduce the heat slightly or shield the chicken with a piece of aluminum foil.
- Continue cooking until the internal temperature reaches 165°F in the thickest part of the thigh, checking with an instant-read thermometer.
Step 5: Rest and Serve
- When the chicken reaches the proper internal temperature, carefully remove the spit from the heat source.
- Using heat-resistant gloves, remove the chicken from the spit and place it on a cutting board.
- Tent the chicken loosely with aluminum foil and let it rest for 15-20 minutes. This critical step allows the juices to redistribute throughout the meat, ensuring maximum juiciness.
- While resting, collect any drippings from the pan to make a quick gravy or sauce if desired.
- After resting, remove the kitchen twine and the aromatics from the cavity.
- Carve the chicken by first removing the legs and thighs, then the wings, and finally slicing the breast meat against the grain.
- Arrange the carved chicken on a platter and drizzle with any collected juices before serving.
What to Serve Spit Chicken With:
Your perfectly roasted spit chicken deserves equally delicious accompaniments to create a memorable meal. For a classic family dinner, serve with creamy mashed potatoes that can soak up those delicious chicken juices. A simple green salad with a light vinaigrette provides a refreshing contrast to the rich, savory chicken.
For a more elevated presentation, consider Mediterranean-inspired sides like roasted lemon potatoes with oregano and garlic, or a colorful Greek salad with feta cheese and olives. The bright, acidic flavors complement the succulent chicken beautifully.
If you’re hosting a summer gathering, pair your spit chicken with grilled vegetables like zucchini, bell peppers, and eggplant. A chilled orzo salad with fresh herbs and cherry tomatoes makes for a refreshing side that can be prepared ahead of time.
For beverage pairings, a crisp Sauvignon Blanc or a light Pinot Noir complements the chicken without overpowering its flavors. For non-alcoholic options, a sparkling lemonade or iced tea with fresh mint adds a refreshing touch to the meal.
Top Tips for Perfecting Spit Chicken:
Balance is Key
Properly balancing your chicken on the spit is crucial for even cooking. If the chicken is off-center, it will cook unevenly and put strain on your rotisserie motor. Take the time to position the chicken centrally on the spit and secure it firmly with the forks. If you’re having trouble achieving balance, try adding metal skewers through the thicker parts of the chicken perpendicular to the spit to help distribute the weight more evenly.
Seasoning Under the Skin
For maximum flavor, don’t just season the outside of the chicken. Gently lift the skin around the breast and thighs without tearing it, and insert herbs, compound butter, or dry rubs directly onto the meat. This technique ensures that the flavor penetrates deep into the chicken rather than just remaining on the surface.
Temperature Management
Maintaining consistent heat is crucial for perfectly cooked spit chicken. Too hot, and the skin will burn before the inside is cooked; too cool, and you’ll end up with rubbery skin. For gas grills, keep the temperature between 350°F-375°F. For charcoal, use a moderate amount of coals and replenish as needed. If you notice the chicken browning too quickly, reduce the heat or shield parts of the chicken with small pieces of aluminum foil.
Brining for Extra Juiciness
For even juicier results, consider brining your chicken before cooking. A simple brine of 1/4 cup kosher salt dissolved in 4 cups of water (plus optional aromatics like garlic, herbs, and lemon) can dramatically improve moisture retention. Submerge the chicken in the brine for 2-4 hours in the refrigerator, then rinse thoroughly and pat dry before proceeding with the recipe.
Substitution Guide
No rotisserie attachment? You can achieve similar results by spatchcocking the chicken (removing the backbone and flattening it) and cooking it on a grill with indirect heat, turning occasionally. For the seasoning blend, feel free to substitute dried herbs with fresh ones (use about three times the amount called for). If you prefer a spicier profile, add cayenne pepper or chili powder to the seasoning mix.
Troubleshooting Common Issues
If your chicken skin isn’t crisping up, make sure you’ve thoroughly dried the bird before seasoning and ensure your cooking temperature is high enough. If the chicken is cooking unevenly, check that it’s properly balanced on the spit and adjust if necessary. For chickens that are browning too quickly on the outside but remain undercooked inside, lower your heat and consider tenting with foil.
Storing and Reheating Tips:
Proper storage of leftover spit chicken ensures you can enjoy its delicious flavor for days to come. Once the chicken has cooled completely (but within two hours of cooking), separate the meat from the bones. Store the meat in airtight containers in the refrigerator for up to 4 days. For longer storage, leftover chicken can be frozen for up to 3 months – just be sure to wrap it tightly in plastic wrap and then place in freezer bags with all air removed to prevent freezer burn.
The best way to reheat rotisserie chicken while maintaining its moisture is to use gentle heat. Place the chicken pieces in a baking dish, add a few tablespoons of chicken broth or water to the bottom, cover tightly with foil, and heat in a 350°F oven for about 15-20 minutes until warmed through. For quicker reheating, use a microwave at 70% power in 30-second intervals, covering the chicken with a damp paper towel to retain moisture.
Don’t waste those bones! After enjoying your spit chicken, use the carcass and any remaining bits to make a flavorful homemade stock. Simply place the bones in a large pot with roughly chopped onion, carrot, celery, and herbs, cover with water, and simmer for 3-4 hours. Strain, cool, and freeze in portions for future soups and sauces.
For meal prep, consider shredding leftover spit chicken to use throughout the week in salads, sandwiches, wraps, or grain bowls. The flavorful meat adds instant protein and taste to any dish. You can also transform leftovers into entirely new meals like chicken enchiladas, chicken pot pie, or a hearty chicken noodle soup.
Frequently Asked Questions
How long does it take to cook a chicken on a rotisserie?
The cooking time for spit chicken depends primarily on the size of the bird. As a general rule, allow approximately 18-20 minutes per pound when cooking at 350°F-375°F. For a standard 4-5 pound chicken, this means about 1.5 hours of cooking time. However, rather than relying solely on time, always use an instant-read thermometer to confirm that the internal temperature has reached 165°F in the thickest part of the thigh.
Can I use a different type of meat for spit roasting?
Absolutely! While this recipe focuses on chicken, the rotisserie method works beautifully for many other meats. Try a pork loin, a boneless leg of lamb, or even a small turkey. Just adjust cooking times accordingly – larger and denser meats will require longer cooking times. For red meats, you’ll also want to adjust your target internal temperature based on desired doneness.
What if I don’t have a rotisserie attachment?
No rotisserie? No problem! You can achieve similar results by spatchcocking a chicken (removing the backbone and flattening it) and cooking it on a grill with indirect heat, turning occasionally. Alternatively, you can roast a seasoned chicken in your oven on a rack set over a baking sheet at 425°F for about 1 hour to 1 hour and 15 minutes, or until it reaches an internal temperature of 165°F.
How do I know when my spit chicken is done cooking?
The only reliable way to determine if your chicken is fully cooked is by checking the internal temperature with an instant-read thermometer. Insert the thermometer into the thickest part of the thigh without touching bone. The chicken is done when it reaches 165°F. For extra juiciness, some chefs remove the chicken at 160°F and let the carryover cooking during resting bring it to the safe temperature.
Can I prepare the chicken in advance?
Yes! You can season the chicken up to
